 Sign In
Recipe cards that cook as a flowchart
A free skill that turns any recipe into a stage-by-stage flowchart card. Works with Claude, ChatGPT, and Gemini — then walk through saving it where you cook.
Claude uses the .skill download. ChatGPT and Gemini: use the copy-paste
prompts in those tabs (no file upload needed).
What you get
Paste a recipe with the skill on. You get a visual flowchart card — and a full write-up — like this brown butter banana bread example.
How to use it
Same workflow, three assistants. Claude uses the .skill package. ChatGPT and Gemini: copy-paste the prompts in those tabs (instructions + HTML template — no downloads or uploads). Pick your assistant below.
Free, Pro, Max, Team & Enterprise — Skills supported
Download the .skill file
Grab
Download .skillrecipe-flowchart-card.skill. Claude accepts.skillor zip uploads that contain aSKILL.md.Turn on code execution
Open Settings → Capabilities and enable Code execution and file creation. Skills need this to run.
Upload in Customize → Skills
Go to Customize → Skills, click +, choose Upload a skill, select the file, then toggle it on.
Paste a recipe and ask
Start a chat with a recipe URL or the full text:
“Use the recipe flowchart skill to turn this into a recipe card.”
Tip: some recipe sites block agents from reading the page. If Claude can’t fetch the URL, copy the recipe text from the site and paste it into the chat instead.
Save to Google Drive
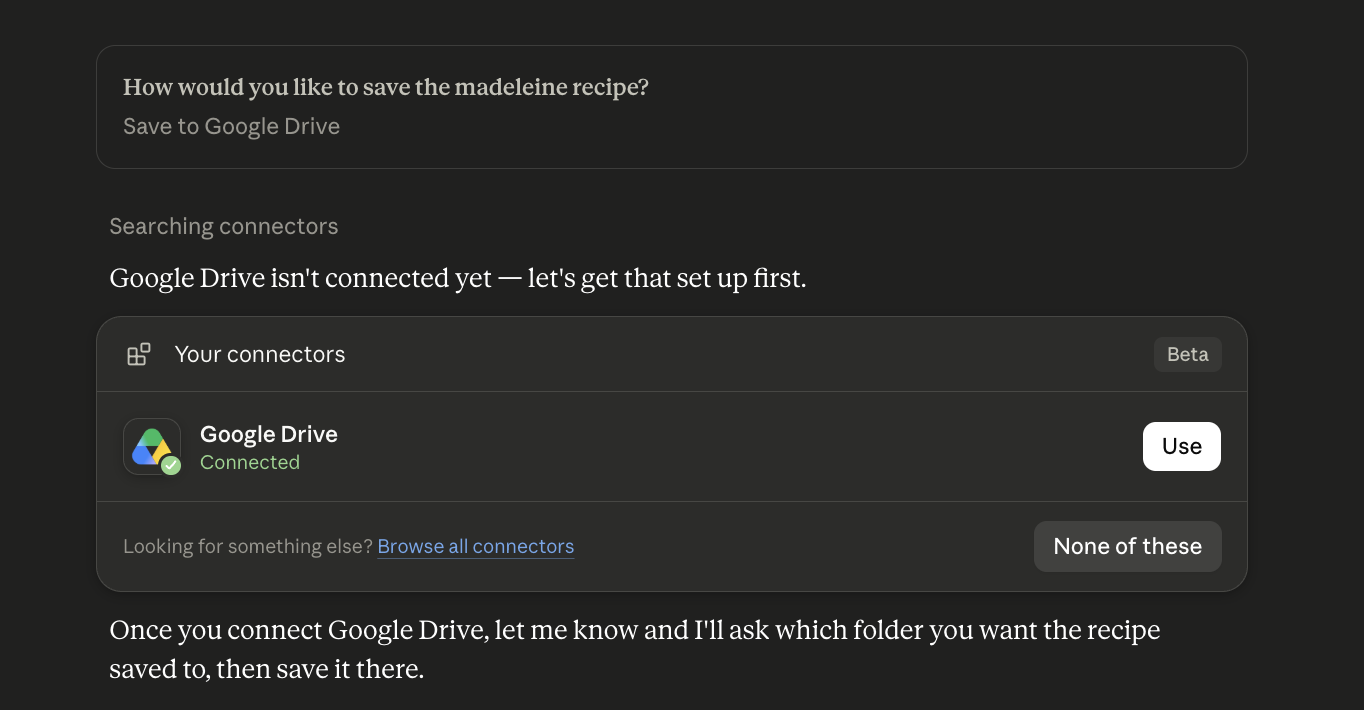
Pick a destination
When Claude asks how to save the recipe, choose Google Drive.
Connect once
If Drive isn’t linked yet, Claude opens connectors — tap Use next to Google Drive and finish the auth flow.
Choose a folder
After connecting, tell Claude you’re ready. It asks which folder to use, then saves the file there.
Free: one compact paste (recommended) · Plus: Custom GPT · Business / Enterprise / Edu: native Skills
Free — compact single paste (recommended)
Free ChatGPT hits limits fast with the full 3-message paste. This compact prompt keeps the same colors, tabs, and print rules (full CSS + a small demo card that shows the wide-table print split), in one message with your recipe.
Note: look-and-feel should match. Very complex multi-stage recipes may need one Edit pass for print column splits — that’s expected on Free, not a broken skill.
Copy the compact prompt
Start a new chat. Copy the prompt below, replace the recipe placeholder at the bottom, and paste it as your only setup message.
Show full compact prompt
# Recipe Flowchart Card — compact paste instructions (ChatGPT Free) Paste-only session: no skill package, no `examples/` files, no `scripts/render_pdf.py`. The HTML template in this same message is your **only** worked example — copy its `<style>`, tabs, table classes, and print rules verbatim. Replace demo content with the user’s recipe; do not invent a new look. ## Locked look (must match template) - Fonts: Inter (body), Montserrat (headings/tabs) - Palette: `--rc-black #000`, `--rc-muted #8e9794`, `--rc-yellow #ffc145`, `--rc-mint #b8d8ba`, `--rc-mint-deep #5f8a62`, `--rc-border #c5d9c7`, `--rc-bg #fff`, `--rc-soft #f7faf7`, `--rc-amber #fff8e1`, `--rc-amber-deep #b8860b` - Roles: `table.flow` mint-deep border · `td.ingredient` soft fill + sticky left · `td.out` amber uppercase · `td.step.finish` mint-deep white text with tight `ol` (`padding-left: 1.15em`) · `.tips` yellow edge · `.star` amber-deep - Real `<table class="flow">` + `rowspan` only — never CSS grid/flex for the flowchart ## Build 1. One self-contained HTML file: title + `.by` yield, tabs (**Recipe Card** / **Full Recipe**), `showTab()` as in the template. 2. Recipe Card: stages as `<h2 class="stage">` + flow tables; verb-first steps; star 3–5 critical bits and explain in `.tips`. 3. Full Recipe: ingredients `<ul>`, instructions `<ol>` (nested ok), same tips, times/yield line. 4. Units as in the source recipe. Don’t drop timing/temps. ## Print / PDF rules (required) Every stage has dual markup: `.table-scroll.screen-only` + sibling `.print-only`. Print CSS must (copy from template): - swap screen/print copies - hide `.tabs`; show **both** `.tab-panel`s - `#panel-full` / `.full-recipe` starts on a **new page** (`break-before: page`) - print tables: max **5 columns**; if wider, split and use greyed `<h2 class="stage print-continued">… (continued)</h2>` + first cell `<td class="carry">↳ …</td>` ## After the card — exact follow-up wording > Your recipe card is ready. What would you like to do next? > > 1. **Edit** — change ingredients, steps, styling, or fix anything that looks off > 2. **Save locally as HTML** > 3. **Save locally as PDF** > 4. **Save to Google Drive as HTML** > 5. **Save to Google Drive as PDF** > > Reply with a number (or a few, e.g. “3 and 5”). Put “Reply with a number…” on its **own line** after the list (blank line after option 5). How to fulfill (ChatGPT Free): - **Edit** — update HTML, re-show, ask again with the same wording - **Save locally as HTML** — fenced html code block for the user to copy into a `.html` file - **Save locally as PDF** — no render script here; tell them to open the HTML in a browser → **Print → Save as PDF** (uses the print dual-markup) - **Drive options** — if no Drive connector, give copy/upload steps; don’t pretend a file was uploaded Output the full HTML card now for the recipe below. --- ## Canonical HTML template (copy CSS/structure verbatim) ```html <!DOCTYPE html> <html lang="en"> <head> <meta charset="UTF-8"> <meta name="viewport" content="width=device-width, initial-scale=1.0"> <title>Compact Template — Recipe Flowchart</title> <link rel="preconnect" href="https://fonts.googleapis.com"> <link rel="preconnect" href="https://fonts.gstatic.com" crossorigin> <link href="https://fonts.googleapis.com/css2?family=Inter:wght@400;500;600&family=Montserrat:wght@600;700&display=swap" rel="stylesheet"> <style> :root { --rc-black: #000000; --rc-muted: #8e9794; --rc-yellow: #ffc145; --rc-mint: #b8d8ba; --rc-mint-deep: #5f8a62; --rc-border: #c5d9c7; --rc-bg: #ffffff; --rc-soft: #f7faf7; --rc-amber: #fff8e1; --rc-amber-deep: #b8860b; } body { font-family: Inter, system-ui, -apple-system, BlinkMacSystemFont, 'Segoe UI', sans-serif; color: var(--rc-black); background: var(--rc-bg); margin: 24px; font-size: 14px; line-height: 1.4; } h1 { font-family: Montserrat, system-ui, sans-serif; font-size: 1.35rem; font-weight: 700; letter-spacing: -0.02em; margin: 0 0 2px; } h1 .by { font-family: Inter, system-ui, sans-serif; font-size: 0.85rem; font-weight: 500; color: var(--rc-muted); } h2.stage { font-family: Montserrat, system-ui, sans-serif; font-size: 0.95rem; font-weight: 700; margin: 26px 0 8px 0; color: var(--rc-black); } h2.stage:first-of-type { margin-top: 8px; } table.flow { border-collapse: collapse; border: 2px solid var(--rc-mint-deep); } .table-scroll { overflow-x: auto; -webkit-overflow-scrolling: touch; padding-bottom: 4px; } table.flow td { border: 1px solid var(--rc-border); padding: 7px 8px; vertical-align: middle; line-height: 1.3; font-size: 13px; } td.ingredient { white-space: normal; min-width: 130px; font-weight: 500; background: var(--rc-soft); position: sticky; left: 0; z-index: 2; box-shadow: 2px 0 4px rgba(0, 0, 0, 0.06); } td.out { text-align: center; font-weight: 700; min-width: 110px; background: var(--rc-amber); text-transform: uppercase; font-size: 11.5px; letter-spacing: 0.3px; } td.step { text-align: center; font-weight: 400; min-width: 65px; } td.step.wide { min-width: 115px; } td.step.narrow { min-width: 55px; } td.step.finish { text-align: left; min-width: 190px; background: var(--rc-mint-deep); color: #fff; font-weight: 600; } /* Keep finish-column numbered lists tight — default <ol> padding (~40px) steals width from the text and forces mid-word wraps in this narrow cell. */ td.step.finish ol { margin: 0; padding-left: 1.15em; padding-right: 0; } td.step.finish li { margin-bottom: 6px; overflow-wrap: anywhere; } td.step.finish li:last-child { margin-bottom: 0; } .star { color: var(--rc-amber-deep); font-weight: 700; } .tips { margin-top: 14px; border-left: 3px solid var(--rc-yellow); padding: 8px 14px; background: rgba(255, 193, 69, 0.1); max-width: 640px; border-radius: 0 8px 8px 0; } .tips h3 { margin: 0 0 8px 0; font-family: Montserrat, system-ui, sans-serif; font-size: 0.8rem; font-weight: 700; color: var(--rc-black); } .tips ul { margin: 0; padding-left: 18px; } .tips li { margin-bottom: 6px; color: #333; } .tabs { display: flex; gap: 4px; margin: 16px 0 24px 0; border-bottom: 2px solid #ececec; } .tab-btn { font-family: Montserrat, system-ui, sans-serif; font-size: 0.8rem; font-weight: 700; background: none; border: none; padding: 8px 10px 10px; color: var(--rc-muted); cursor: pointer; border-bottom: 3px solid transparent; margin-bottom: -2px; } .tab-btn.active { color: var(--rc-black); border-bottom-color: var(--rc-yellow); } .tab-panel { display: none; } .tab-panel.active { display: block; } .full-recipe h2 { font-family: Montserrat, system-ui, sans-serif; font-size: 0.95rem; font-weight: 700; color: var(--rc-black); margin: 22px 0 8px 0; padding-bottom: 6px; border-bottom: 2px solid var(--rc-yellow); } .full-recipe h2:first-of-type { margin-top: 0; } .full-recipe ul { margin: 0 0 4px 0; padding-left: 20px; } .full-recipe ul li { margin-bottom: 5px; } .full-recipe ol { margin: 0; padding-left: 22px; } .full-recipe ol > li { margin-bottom: 14px; font-weight: 600; } .full-recipe ol ol { margin-top: 6px; padding-left: 20px; } .full-recipe ol ol li { font-weight: 400; margin-bottom: 6px; } /* --- Print export: dual markup --- */ /* A browser can't auto-split a wide table across print pages, so every stage renders twice: a .screen-only copy (unchanged, horizontal-scroll) and a .print-only copy (column-capped, word-wrapped, split into stacked tables if needed). @media print swaps which one shows. */ .print-only { display: none; } h2.stage.print-continued { font-style: italic; font-weight: 600; font-size: 0.85rem; color: var(--rc-muted); margin: 10px 0 6px 0; } td.carry { font-style: italic; color: var(--rc-muted); background: var(--rc-soft); } @media print { .screen-only { display: none !important; } .print-only { display: block !important; } /* Both tabs print: hide the tab switcher, force both panels visible, and start Full Recipe on a new page after the flowchart card. */ .tabs { display: none !important; } .tab-panel { display: block !important; } #panel-full, .tab-panel.full-recipe { break-before: page; page-break-before: always; } @page { size: letter portrait; margin: 0.55in; } table.flow.print-table { table-layout: fixed; width: 100%; } table.flow.print-table td { white-space: normal; overflow-wrap: break-word; word-break: break-word; min-width: 0; } } /* Mobile: still scrolls, never splits — narrower min-widths just make the scrollbar kick in sooner, with far fewer columns visible at once. */ @media screen and (max-width: 480px) { td.ingredient { min-width: 92px; } td.step { min-width: 48px; } td.step.wide { min-width: 78px; } td.step.narrow { min-width: 40px; } } </style> </head> <body> <h1>Demo Toast <span class="by">(yield: 2 slices · example template only)</span></h1> <div class="tabs"> <button class="tab-btn active" id="btn-card" onclick="showTab('card')">Recipe Card</button> <button class="tab-btn" id="btn-full" onclick="showTab('full')">Full Recipe</button> </div> <div id="panel-card" class="tab-panel active"> <!-- Simple stage (≤5 cols): print copy is a direct duplicate --> <h2 class="stage">Butter</h2> <div class="table-scroll screen-only"> <table class="flow"> <tr> <td class="ingredient">2 Tbsp unsalted butter</td> <td class="step wide">melt until foaming</td> <td class="out">Butter</td> </tr> </table> </div> <div class="print-only"> <table class="flow print-table"> <tr> <td class="ingredient">2 Tbsp unsalted butter</td> <td class="step wide">melt until foaming</td> <td class="out">Butter</td> </tr> </table> </div> <!-- Wide stage (>5 cols): split print copy; greyed continued heading + td.carry --> <h2 class="stage">Assemble & Toast</h2> <div class="table-scroll screen-only"> <table class="flow"> <tr> <td class="ingredient">2 slices bread</td> <td rowspan="2" class="step wide">brush with melted butter <span class="star">*</span></td> <td rowspan="2" class="step">add pinch salt</td> <td rowspan="2" class="out">Ready</td> <td rowspan="2" class="step narrow">toast 2–3 min</td> <td rowspan="2" class="step finish"> <ol> <li>flip once</li> <li>serve hot <span class="star">*</span></li> </ol> </td> </tr> <tr> <td class="ingredient">↳ Butter</td> </tr> </table> </div> <!-- print: 6 cols > cap of 5 → split after Ready --> <div class="print-only"> <table class="flow print-table"> <tr> <td class="ingredient">2 slices bread</td> <td rowspan="2" class="step wide">brush with melted butter <span class="star">*</span></td> <td rowspan="2" class="step">add pinch salt</td> <td rowspan="2" class="out">Ready</td> </tr> <tr> <td class="ingredient">↳ Butter</td> </tr> </table> <h2 class="stage print-continued">Assemble & Toast (continued)</h2> <table class="flow print-table"> <tr> <td class="carry">↳ Ready</td> <td class="step narrow">toast 2–3 min</td> <td class="step finish"> <ol> <li>flip once</li> <li>serve hot <span class="star">*</span></li> </ol> </td> </tr> </table> </div> <div class="tips"> <h3>Tips</h3> <ul> <li><strong>Brushing:</strong> coat edge-to-edge so the toast browns evenly.</li> <li><strong>Serve hot:</strong> butter firms as it cools; eat right away.</li> </ul> </div> </div> <div id="panel-full" class="tab-panel full-recipe"> <h2>Ingredients</h2> <ul> <li>2 Tbsp unsalted butter</li> <li>2 slices bread</li> <li>Pinch of salt</li> </ul> <h2>Instructions</h2> <ol> <li>Melt butter until foaming.</li> <li>Brush onto bread, salt lightly, toast 2–3 min, flip once, serve hot.</li> </ol> <div class="tips"> <h3>Tips</h3> <ul> <li><strong>Brushing:</strong> coat edge-to-edge so the toast browns evenly.</li> <li><strong>Serve hot:</strong> butter firms as it cools; eat right away.</li> </ul> </div> <p style="margin-top:20px; color: var(--rc-muted); font-size: 12px;">Prep: 2 min · Cook: 3 min · Yield: 2 slices</p> </div> <script> function showTab(tab) { document.getElementById('panel-card').classList.toggle('active', tab === 'card'); document.getElementById('panel-full').classList.toggle('active', tab === 'full'); document.getElementById('btn-card').classList.toggle('active', tab === 'card'); document.getElementById('btn-full').classList.toggle('active', tab === 'full'); } </script> </body> </html> ``` --- ## Recipe to convert [PASTE RECIPE URL OR FULL RECIPE TEXT HERE]Tip: if ChatGPT can’t fetch a recipe URL, paste the full recipe text instead. Same chat: send more recipes without re-pasting the template.
Plus — Custom GPT (reusable)
Create a Custom GPT
Custom GPT creation needs ChatGPT Plus (or higher). Open GPTs → Create, name it (e.g. “Recipe flowchart”), paste the full skill
.mdinto Instructions, then download and upload the example.htmlunder Knowledge (file knowledge is more reliable than pasting the full HTML into Instructions).Chat with that GPT
Open your GPT anytime, paste a recipe (or a URL), and ask for a flowchart card — no re-upload each session. If a site blocks fetching, paste the recipe text instead.
Business / Enterprise / Edu — native Skills upload
Open Plugins → Skills
Personal Skills are generally available on ChatGPT Business, Enterprise, Healthcare, and Edu. In the sidebar open Plugins → Skills. Workspace admins may need to enable Skills / skill uploading first.
Upload from your computer
Choose Create → Upload from your computer. Zip a folder that contains
SKILL.md(renamerecipe-flowchart-card.mdtoSKILL.md) plus the examplebrown-butter-banana-bread.html, then install/toggle the skill on.Use it in chat
Ask ChatGPT to use the recipe flowchart skill on your recipe. ChatGPT scans uploaded skills before they become available. If a site blocks fetching, paste the recipe text into the chat instead of only sharing the URL.
Free: paste instructions + HTML into chat (don’t upload) · Custom Gems need Gemini Advanced / Google One AI Premium (or qualifying Workspace)
Important: Gemini only returns the
recipe card as HTML code in the chat
— it does not render the interactive card. Copy that HTML to a
.html file on your computer or Google Drive, then open it in a browser to
view the flowchart.
Free — paste the instructions + template
Recommended: don’t upload the
.md or .html as attachments. Paste the prompts below into chat
instead (two messages, then your recipe).
Message 1 — paste the skill instructions
On gemini.google.com, start a new chat. Copy the prompt (includes the full
recipe-flowchart-card.md) and paste it as your first message.Show full prompt (includes .md)
You are following recipe-flowchart-card instructions in a paste-only chat (ChatGPT / Gemini). There is no skill package, no examples/ folder, and no scripts/render_pdf.py — do not ask for those files. Read the instructions below carefully. The next message will paste the canonical HTML template; treat that HTML as your only worked example and copy its CSS/structure verbatim. Confirm you’re ready, then wait for that template. --- --- name: recipe-flowchart-card description: Generate a "Cooking For Engineers" style recipe flowchart card from any recipe (ingredients + instructions). Produces a self-contained HTML file with a mint-green-bordered, tabbed flowchart table showing ingredients merging into process steps over time, matching Michael Chu's classic Cooking For Engineers visual format. Use this skill whenever the user asks to turn a recipe into a "recipe card," "flowchart recipe," "visual recipe," references "Cooking For Engineers" or "CFE style," or pastes in a recipe and asks for it in table/diagram form. Also trigger if the user asks to generate the prompt/template for making one of these cards from any future recipe. --- # Recipe Flowchart Card Generator Recreates the Cooking For Engineers (Michael Chu) recipe flowchart format: ingredients listed down the left, flowing rightward through merged cells as they're combined and processed, ending in a final plated/finished step. ## When to use this - User pastes a recipe (ingredients + steps) and wants it visualized as a flowchart/table - User asks for a "recipe card," "CFE-style recipe," or references the Cooking For Engineers format - User wants a reusable prompt/template to generate this format from any recipe in the future ## Worked examples — use the template you actually have **Copy CSS/structure verbatim** from the canonical HTML template (colors, fonts, tab markup, table markup, print dual-markup) — don't reinvent the styling from scratch. How to get that template depends on how these instructions were loaded: 1. **Paste / chat-only sessions (ChatGPT, Gemini, or any chat where no skill package was uploaded)** There are **no** `examples/` files and **no** `input.txt` / `output.html` paths to open. The user will paste a full HTML template in a **following message**. That pasted HTML **is** the sole worked example — treat it as canonical and copy its `<style>`, tabs, table classes, print/screen dual markup, and scripts verbatim. Do not ask for missing example files. 2. **Claude / ChatGPT skill package (`.skill` or zip containing this `SKILL.md`)** Two full input → output pairs are bundled. Read the `output.html` files directly: - `examples/pandan-extract/input.txt` → `examples/pandan-extract/output.html` (simple, single-stage) - `examples/banana-bread/input.txt` → `examples/banana-bread/output.html` (multi-stage) Prefer the multi-stage banana-bread example when the recipe has several converging mixtures; use pandan-extract for a simple one-table case. ## Critical implementation rule: locked visual system (do not invent a new look) Every card must use this exact visual system. **Copy the full `<style>` block from a worked example** and only change recipe content. Do not swap fonts, invent new colors, restyle tabs, or change cell fills. ### Palette (CSS variables — exact hex values) ```css :root { --rc-black: #000000; --rc-muted: #8e9794; --rc-yellow: #ffc145; --rc-mint: #b8d8ba; --rc-mint-deep: #5f8a62; --rc-border: #c5d9c7; --rc-bg: #ffffff; --rc-soft: #f7faf7; --rc-amber: #fff8e1; --rc-amber-deep: #b8860b; } ``` ### Fonts - Body / cell text: **Inter** (Google Fonts weights 400/500/600) - Headings / tabs / stage labels: **Montserrat** (weights 600/700) - Include the same Google Fonts `<link>` tags as the worked examples ### Cell / section roles (must match) | Role | Markup | Look | |------|--------|------| | Table frame | `table.flow` | 2px solid `--rc-mint-deep` border | | Ingredient | `td.ingredient` | soft green fill `--rc-soft`; sticky left | | Process step | `td.step` / `.wide` / `.narrow` | plain white, centered | | Named output | `td.out` | amber fill `--rc-amber`, uppercase, bold | | Finish sequence | `td.step.finish` | deep mint fill `--rc-mint-deep`, white text, left-aligned `<ol>` | | Tips | `.tips` | yellow left border `--rc-yellow`, light yellow wash | | Active tab underline | `.tab-btn.active` | `--rc-yellow` | | Full-recipe `h2` underline | `.full-recipe h2` | `--rc-yellow` | | Technique marker | `.star` | `--rc-amber-deep` | Do **not** recolor stages per recipe, use purple/blue themes, drop the mint border, or restyle `td.out` / `td.step.finish` differently from the examples. ## Critical implementation rule: the ingredient column must stay sticky on horizontal scroll Every `td.ingredient` cell must use `position: sticky; left: 0; z-index: 2;` (plus a subtle `box-shadow` to separate it from scrolling content behind it). Wide flowcharts scroll horizontally inside `.table-scroll`, and without this rule the ingredient names scroll off-screen, leaving no way to tell which ingredient a given process step corresponds to. Both worked examples now include this — copy it verbatim into any new card's CSS. ## Critical implementation rule: keep finish-column numbered lists tight `td.step.finish` cells are narrow mint columns that hold a short numbered sequence (`<ol>` of 2–4 steps like cool → unmold → slice). **Do not rely on the browser's default `<ol>` padding** — it's ~40px and steals so much width that words truncate mid-string (`parchmen` / `t`, `completel` / `y`). Every card must include this CSS, copied from the worked examples: ```css td.step.finish ol { margin: 0; padding-left: 1.15em; padding-right: 0; } td.step.finish li { margin-bottom: 6px; overflow-wrap: anywhere; } td.step.finish li:last-child { margin-bottom: 0; } ``` `1.15em` keeps the numbers readable while giving the text nearly the full cell width. Apply this whenever a finish cell uses an `<ol>` — both worked examples do. ## Critical implementation rule: every stage table needs a dual screen/print markup A browser can't auto-split a wide table across print pages, so CSS alone can't make a wide flowchart print cleanly — the fix is dual markup: build every stage table twice, and let `@media print` swap which copy shows. **Both worked examples now do this for every stage — copy the pattern verbatim.** 1. **Wrap the existing scrollable table** in `<div class="table-scroll screen-only">` (unchanged, still horizontal-scrolls on screen), then add a sibling `<div class="print-only">` right after it containing a print-safe copy of the same stage. 2. **Toggle by media type** — this CSS block goes in every card's `<style>`, copied verbatim from the worked examples: ```css .print-only { display: none; } @media print { .screen-only { display: none !important; } .print-only { display: block !important; } /* Both tabs print: hide the tab switcher, force both panels visible, and start Full Recipe on a new page after the flowchart card. */ .tabs { display: none !important; } .tab-panel { display: block !important; } #panel-full, .tab-panel.full-recipe { break-before: page; page-break-before: always; } @page { size: letter portrait; margin: 0.55in; } table.flow.print-table { table-layout: fixed; width: 100%; } table.flow.print-table td { white-space: normal; overflow-wrap: break-word; word-break: break-word; min-width: 0; } } @media screen and (max-width: 480px) { td.ingredient { min-width: 92px; } td.step { min-width: 48px; } td.step.wide { min-width: 78px; } td.step.narrow { min-width: 40px; } } ``` `table-layout: fixed` + `overflow-wrap` is what forces text to wrap and columns to stay inside the page instead of overflowing. The mobile query never splits anything — it just shrinks min-widths so the existing horizontal scrollbar kicks in sooner. **PDF / print must include both tabs.** On screen, only one `.tab-panel` is visible at a time. In `@media print`, both panels must show (`display: block !important`), the `.tabs` bar is hidden, and `#panel-full` / `.tab-panel.full-recipe` starts on a **new page** via `break-before: page` (with `page-break-before: always` for older engines). Never ship a card whose print/PDF output is only the flowchart and omits the Full Recipe write-up. 3. **Cap the print copy at 5 columns** (identifier + 4) — that's what fits comfortably in Letter-portrait's ~7.5in usable width, given this skill's typical column widths. - If a stage's screen table has more columns than that, split the print copy into two (or more) stacked `<table class="flow print-table">` blocks. - Split at a natural named output when possible (e.g., "Batter") — the second segment's first cell becomes a `<td class="carry">↳ Batter</td>` referencing that output, and the segment gets its own `<h2 class="stage print-continued">Stage Name (continued)</h2>` heading. See the banana bread example's "Assembly & Bake" stage for the canonical case. - If there's no natural intermediate output at the split point (e.g., a column whose `rowspan` already covers every row in the stage — meaning all ingredient rows have already converged), the continuation table only needs a single row: one `td.carry` cell describing what's been combined so far, then the remaining columns. See the banana bread example's "Wet Mixture" stage. - Stages that already fit in 5 columns don't need a split — the print copy is a direct duplicate of the screen table, just marked `print-table` (see the pandan-extract example, or the Bananas/Dry Mix stages in banana bread). ### Print continuation look (greyed header + carry cell) — required CSS When a wide stage splits into a second print table, the continuation must look visually secondary (greyed), not like a brand-new stage. Every card's `<style>` must include: ```css h2.stage.print-continued { font-style: italic; font-weight: 600; font-size: 0.85rem; color: var(--rc-muted); margin: 10px 0 6px 0; } td.carry { font-style: italic; color: var(--rc-muted); background: var(--rc-soft); } ``` Rules: - Continuation heading text is always `Stage Name (continued)` on `<h2 class="stage print-continued">`. - The first cell of the continuation table is always `<td class="carry">` (usually `↳ …`), never a normal black `td.ingredient`. - Do not use bold black stage styling for the continued heading — muted/italic is what signals “same stage, next columns” in the PDF. ## Critical implementation rule: use real HTML `<table>` + `rowspan`/`colspan`, never CSS grid/flexbox An earlier version of this skill built cells with CSS Grid and `display:flex` on each cell. This broke badly: `display:flex` on a cell containing mixed text and `<b>`/`<i>` tags splits the text into separate flex items instead of letting it wrap as normal prose, producing jumbled, overlapping text. CSS Grid also has no equivalent of native rowspan behavior, so merges required fragile manual row/column math that was error-prone. **Always build the flowchart with a real `<table class="flow">`, using native `rowspan` on `<td>` elements to show ingredients merging.** This is what both worked examples do, and it's far more robust: - Each ingredient gets its own `<tr>` with a `<td class="ingredient">` cell. - A process step that combines N ingredient-rows gets `rowspan="N"` and is placed once, in the `<tr>` of the *first* ingredient it applies to. - Rows for ingredients that enter later only need a single `<td class="ingredient">` — the browser automatically places it in the first unoccupied column (normally the ingredient column), and any columns with no active rowspan and no cell for that row are simply left blank. This is expected and matches the reference look (see the pandan example's "½ cup water" row, which has no wash/cut cell). - Never add filler/empty `<td>` cells to "pad" a row — let the table's natural placement handle it. ## How to build the card Output a **single self-contained HTML file** (the CSS block from the worked examples, inline, no external dependencies except the Google Fonts `<link>` tags), following these rules: 1. **Overall page structure**: `<h1>` with recipe name + a `.by` span for yield/serving/source, then a `.tabs` bar with two buttons — "Recipe Card" (active by default) and "Full Recipe" — toggling two `.tab-panel` divs via the `showTab()` script. Reuse the exact script and CSS from the worked examples. 2. **Recipe Card tab**: this holds the flowchart itself. - **Group ingredients into sub-recipe blocks** if the recipe has distinct components (e.g., "wet mixture," "dry mix," "infusion"). Each block gets its own `<h2 class="stage">` label and its own `<table class="flow">`, stacked vertically. - **Left-to-right flow logic**: each row starts with one ingredient (`td.ingredient`). As ingredients combine, use `rowspan` on the process-step `<td>`s (`td.step`, `td.step.wide`, `td.step.narrow`) to show them converging into a single action. The final result of a block gets a `td.out` cell (or `td.step.finish` for a multi-line final sequence, as in the pandan example). - **Process step labels**: short, verb-first descriptions, always including timing/temperature when given in the source. Mark the 3–5 most technique-critical steps with `<span class="star">*</span>` and expand on them in the Tips box below the table — don't star everything. - **Sequential singular steps** (no merging needed — e.g., "cool 15 min" → "bake" → "cool completely") continue as their own columns to the right, still carried by the same `rowspan` chain from the last merge point. - **Tips box** (`.tips`): 3–5 items, each `<strong>label:</strong> explanation`, directly elaborating on the starred steps above. 3. **Full Recipe tab**: a plain-language fallback — `<h2>Ingredients</h2>` as a `<ul>`, `<h2>Instructions</h2>` as a numbered `<ol>` (nested `<ol>` for sub-steps, matching the source recipe's own step grouping), a repeated Tips/Why-it-works box, and a closing line with prep/bake/total time + yield (+ source link if the recipe came from a named source). 4. **Ingredient formatting**: quantity + name, matching the source recipe's own units — don't convert or add units that aren't already present. 5. **Completeness**: every mixing, resting, temperature, or timing detail from the source recipe must appear somewhere on the card (flowchart cell, tip, or Full Recipe step). Collapse sub-steps into one clear cell rather than omitting detail — never drop information to simplify the visual. ## Output - If the user gave a recipe directly: build the HTML file and present it as an artifact/file. - If the user wants the reusable prompt itself (not a rendered card): output the instructions above as a copy-pasteable prompt template with a `[PASTE RECIPE HERE]` placeholder, so it can be used in any future chat. ## After presenting the card Once the HTML file has been generated and presented, ask the user a **single follow-up** using this **exact wording** (same structure and option labels every time — do not paraphrase, reorder, or invent alternate phrasings): > Your recipe card is ready. What would you like to do next? > > 1. **Edit** — change ingredients, steps, styling, or fix anything that looks off > 2. **Save locally as HTML** > 3. **Save locally as PDF** > 4. **Save to Google Drive as HTML** > 5. **Save to Google Drive as PDF** > > Reply with a number (or a few, e.g. “3 and 5”). The “Reply with a number…” sentence must be on its **own line after the numbered list** (blank line between option 5 and that sentence) — never on the same line as option 5. Do **not** run any of those actions unprompted — wait for the user to pick. How to carry out each choice once selected: 1. **Edit** — apply the edit directly to the HTML and re-present it, then ask the same follow-up again (same wording). 2. **Save locally as HTML** - **Skill package / artifact environment:** save the self-contained HTML (e.g. to `/mnt/user-data/outputs` when that path exists) and present it for download. - **Paste / chat-only (ChatGPT, Gemini):** provide the full HTML in a fenced html code block so the user can copy it into a `.html` file. Do not claim a local file was written on their machine unless the product actually offers a download. 3. **Save locally as PDF** - **When `scripts/render_pdf.py` is available** (bundled with the `.skill` package): convert with Playwright/Chromium, then save for download: ```bash python scripts/render_pdf.py <path-to-card.html> <path-to-output.pdf> ``` **Do not use the generic `pdf` skill or `wkhtmltopdf` for this** — wkhtmltopdf's older Qt engine doesn't honor `@media print`, so it renders the wide `.screen-only` table instead of the column-capped `.print-only` split and the output overflows the page. - **Paste / chat-only (no render script):** do **not** invent a PDF binary. Tell the user to open the HTML in a browser and use **Print → Save as PDF** (or the browser’s Export to PDF). Remind them that print layout depends on the dual `screen-only` / `print-only` markup already in the card — they should print/export from the browser, not screenshot the on-screen scrollable table. 4. **Save to Google Drive as HTML** — upload the HTML file as-is when a Google Drive connector is available; otherwise give clear copy/download steps and ask them to upload manually or connect Drive. 5. **Save to Google Drive as PDF** — produce/obtain a PDF the same way as option 3 for this environment, then upload when Drive is available; otherwise give the HTML and the browser Print → Save as PDF + upload instructions. Notes: - If the user picks any option, carry it out directly rather than re-asking for confirmation — they've already chosen. - Options 3 and 5 both need a PDF. If a PDF was already generated earlier in the conversation, reuse it instead of re-rendering. - Options 4 and 5 require a Google Drive connector when available. If none is available, say so and give manual steps rather than failing silently. - Never tell the user to open `examples/…`, `input.txt`, `output.html`, or `scripts/render_pdf.py` unless those files were actually provided in this session (skill package). In paste-only chats they do not exist. - The user may ask for more than one at once (e.g. “3 and 5”) — do them in sequence and confirm each. - After completing any of 2–5, you may briefly re-offer remaining options, but keep the same five labels (`Edit` / `Save locally as HTML` / `Save locally as PDF` / `Save to Google Drive as HTML` / `Save to Google Drive as PDF`) — do not invent new wording. ## Reference example The canonical visual reference is Michael Chu's Cooking For Engineers "Macaroni and Cheese Bake" recipe card: ingredient rows on the left, converging through labeled process cells (e.g., "cook while stirring until light brown," "stir in slowly," "remove from heat when thickened"), ending in "pour into pan → top → bake → let rest." Match that density and merging logic using the HTML template available in this session (pasted template and/or bundled `examples/` outputs) — same structure for any new recipe, regardless of cuisine or complexity.Message 2 — paste the example HTML
In the same chat, copy the next prompt (includes the full
brown-butter-banana-bread.html) and paste it. Don’t upload the file.Show full prompt (includes .html)
Here is the full canonical HTML template for this paste-only session (brown butter banana bread). There are no separate input.txt / output.html example files — this HTML is the sole reference. Keep it verbatim: styles (including the locked --rc-* palette), tabs, table classes, sticky ingredient column, tight finish-list padding, dual screen-only/print-only markup, greyed print-continued headings, td.carry cells, print rules that show both tab panels with a page break before Full Recipe, and scripts. Confirm you have the complete file, then wait for my recipe. ```html <!DOCTYPE html> <html lang="en"> <head> <meta charset="UTF-8"> <meta name="viewport" content="width=device-width, initial-scale=1.0"> <title>Brown Butter Banana Bread — Recipe Flowchart</title> <link rel="preconnect" href="https://fonts.googleapis.com"> <link rel="preconnect" href="https://fonts.gstatic.com" crossorigin> <link href="https://fonts.googleapis.com/css2?family=Inter:wght@400;500;600&family=Montserrat:wght@600;700&display=swap" rel="stylesheet"> <style> :root { --rc-black: #000000; --rc-muted: #8e9794; --rc-yellow: #ffc145; --rc-mint: #b8d8ba; --rc-mint-deep: #5f8a62; --rc-border: #c5d9c7; --rc-bg: #ffffff; --rc-soft: #f7faf7; --rc-amber: #fff8e1; --rc-amber-deep: #b8860b; } body { font-family: Inter, system-ui, -apple-system, BlinkMacSystemFont, 'Segoe UI', sans-serif; color: var(--rc-black); background: var(--rc-bg); margin: 24px; font-size: 14px; line-height: 1.4; } h1 { font-family: Montserrat, system-ui, sans-serif; font-size: 1.35rem; font-weight: 700; letter-spacing: -0.02em; margin: 0 0 2px; } h1 .by { font-family: Inter, system-ui, sans-serif; font-size: 0.85rem; font-weight: 500; color: var(--rc-muted); } h2.stage { font-family: Montserrat, system-ui, sans-serif; font-size: 0.95rem; font-weight: 700; margin: 26px 0 8px 0; color: var(--rc-black); } h2.stage:first-of-type { margin-top: 8px; } table.flow { border-collapse: collapse; border: 2px solid var(--rc-mint-deep); } .table-scroll { overflow-x: auto; -webkit-overflow-scrolling: touch; padding-bottom: 4px; } table.flow td { border: 1px solid var(--rc-border); padding: 7px 8px; vertical-align: middle; line-height: 1.3; font-size: 13px; } td.ingredient { white-space: normal; min-width: 130px; font-weight: 500; background: var(--rc-soft); position: sticky; left: 0; z-index: 2; box-shadow: 2px 0 4px rgba(0, 0, 0, 0.06); } td.out { text-align: center; font-weight: 700; min-width: 110px; background: var(--rc-amber); text-transform: uppercase; font-size: 11.5px; letter-spacing: 0.3px; } td.step { text-align: center; font-weight: 400; min-width: 65px; } td.step.wide { min-width: 115px; } td.step.narrow { min-width: 55px; } td.step.finish { text-align: left; min-width: 190px; background: var(--rc-mint-deep); color: #fff; font-weight: 600; } /* Keep finish-column numbered lists tight — default <ol> padding (~40px) steals width from the text and forces mid-word wraps in this narrow cell. */ td.step.finish ol { margin: 0; padding-left: 1.15em; padding-right: 0; } td.step.finish li { margin-bottom: 6px; overflow-wrap: anywhere; } td.step.finish li:last-child { margin-bottom: 0; } .star { color: var(--rc-amber-deep); font-weight: 700; } .tips { margin-top: 14px; border-left: 3px solid var(--rc-yellow); padding: 8px 14px; background: rgba(255, 193, 69, 0.1); max-width: 640px; border-radius: 0 8px 8px 0; } .tips h3 { margin: 0 0 8px 0; font-family: Montserrat, system-ui, sans-serif; font-size: 0.8rem; font-weight: 700; color: var(--rc-black); } .tips ul { margin: 0; padding-left: 18px; } .tips li { margin-bottom: 6px; color: #333; } .tabs { display: flex; gap: 4px; margin: 16px 0 24px 0; border-bottom: 2px solid #ececec; } .tab-btn { font-family: Montserrat, system-ui, sans-serif; font-size: 0.8rem; font-weight: 700; background: none; border: none; padding: 8px 10px 10px; color: var(--rc-muted); cursor: pointer; border-bottom: 3px solid transparent; margin-bottom: -2px; } .tab-btn.active { color: var(--rc-black); border-bottom-color: var(--rc-yellow); } .tab-panel { display: none; } .tab-panel.active { display: block; } .full-recipe h2 { font-family: Montserrat, system-ui, sans-serif; font-size: 0.95rem; font-weight: 700; color: var(--rc-black); margin: 22px 0 8px 0; padding-bottom: 6px; border-bottom: 2px solid var(--rc-yellow); } .full-recipe h2:first-of-type { margin-top: 0; } .full-recipe ul { margin: 0 0 4px 0; padding-left: 20px; } .full-recipe ul li { margin-bottom: 5px; } .full-recipe ol { margin: 0; padding-left: 22px; } .full-recipe ol > li { margin-bottom: 14px; font-weight: 600; } .full-recipe ol ol { margin-top: 6px; padding-left: 20px; } .full-recipe ol ol li { font-weight: 400; margin-bottom: 6px; } /* --- Print export: dual markup --- */ /* A browser can't auto-split a wide table across print pages, so every stage renders twice: a .screen-only copy (unchanged, horizontal-scroll) and a .print-only copy (column-capped, word-wrapped, split into stacked tables if needed). @media print swaps which one shows. */ .print-only { display: none; } h2.stage.print-continued { font-style: italic; font-weight: 600; font-size: 0.85rem; color: var(--rc-muted); margin: 10px 0 6px 0; } td.carry { font-style: italic; color: var(--rc-muted); background: var(--rc-soft); } @media print { .screen-only { display: none !important; } .print-only { display: block !important; } /* Both tabs print: hide the tab switcher, force both panels visible, and start Full Recipe on a new page after the flowchart card. */ .tabs { display: none !important; } .tab-panel { display: block !important; } #panel-full, .tab-panel.full-recipe { break-before: page; page-break-before: always; } @page { size: letter portrait; margin: 0.55in; } table.flow.print-table { table-layout: fixed; width: 100%; } table.flow.print-table td { white-space: normal; overflow-wrap: break-word; word-break: break-word; min-width: 0; } } /* Mobile: still scrolls, never splits — narrower min-widths just make the scrollbar kick in sooner, with far fewer columns visible at once. */ @media screen and (max-width: 480px) { td.ingredient { min-width: 92px; } td.step { min-width: 48px; } td.step.wide { min-width: 78px; } td.step.narrow { min-width: 40px; } } </style> </head> <body> <h1>Brown Butter Banana Bread <span class="by">(yield: one 8.5×4.5-in loaf · oven 350°F/175°C)</span></h1> <div class="tabs"> <button class="tab-btn active" id="btn-card" onclick="showTab('card')">Recipe Card</button> <button class="tab-btn" id="btn-full" onclick="showTab('full')">Full Recipe</button> </div> <div id="panel-card" class="tab-panel active"> <h2 class="stage">Wet Mixture</h2> <div class="table-scroll screen-only"> <table class="flow"> <tr> <td class="ingredient">113 g unsalted butter</td> <td class="step wide">melt & swirl over medium heat until golden brown & nutty <span class="star">*</span> (4–5 min)</td> <td class="step narrow">cool 5 min</td> <td rowspan="2" class="step wide">whisk together</td> <td rowspan="3" class="step wide">whisk in eggs, one at a time</td> <td rowspan="5" class="step wide">whisk in sour cream & vanilla until smooth</td> <td rowspan="5" class="out">Wet Mixture</td> </tr> <tr> <td class="ingredient">110 g dark brown sugar, packed</td> </tr> <tr> <td class="ingredient">2 large eggs, room temp</td> </tr> <tr> <td class="ingredient">60 g sour cream (or plain full-fat Greek yogurt)</td> </tr> <tr> <td class="ingredient">1 tsp pure vanilla extract</td> </tr> </table> </div> <!-- print copy: 7 cols > cap of 5, so split after "whisk in eggs" — cols 6–7 (whisk in sour cream/vanilla → Wet Mixture) already carry rowspan="5", meaning by that point all five ingredient rows have already converged, so the continuation only needs a single carry row. --> <div class="print-only"> <table class="flow print-table"> <tr> <td class="ingredient">113 g unsalted butter</td> <td class="step wide">melt & swirl over medium heat until golden brown & nutty <span class="star">*</span> (4–5 min)</td> <td class="step narrow">cool 5 min</td> <td rowspan="2" class="step wide">whisk together</td> <td rowspan="3" class="step wide">whisk in eggs, one at a time</td> </tr> <tr> <td class="ingredient">110 g dark brown sugar, packed</td> </tr> <tr> <td class="ingredient">2 large eggs, room temp</td> </tr> <tr> <td class="ingredient">60 g sour cream (or plain full-fat Greek yogurt)</td> </tr> <tr> <td class="ingredient">1 tsp pure vanilla extract</td> </tr> </table> <h2 class="stage print-continued">Wet Mixture (continued)</h2> <table class="flow print-table"> <tr> <td class="carry">↳ butter, sugar, eggs, sour cream & vanilla, whisked</td> <td class="step wide">whisk in sour cream & vanilla until smooth</td> <td class="out">Wet Mixture</td> </tr> </table> </div> <h2 class="stage">Bananas</h2> <div class="table-scroll screen-only"> <table class="flow"> <tr> <td class="ingredient">400 g very ripe bananas (~3–4 medium, heavily spotted/black)</td> <td class="step wide">mash thoroughly with a fork (a few tiny lumps are fine)</td> <td class="out">Mashed Banana</td> </tr> </table> </div> <!-- print copy: 3 cols, under the cap of 5 — direct duplicate, no split needed --> <div class="print-only"> <table class="flow print-table"> <tr> <td class="ingredient">400 g very ripe bananas (~3–4 medium, heavily spotted/black)</td> <td class="step wide">mash thoroughly with a fork (a few tiny lumps are fine)</td> <td class="out">Mashed Banana</td> </tr> </table> </div> <h2 class="stage">Dry Mix</h2> <div class="table-scroll screen-only"> <table class="flow"> <tr> <td class="ingredient">180 g all-purpose flour</td> <td rowspan="4" class="step wide">whisk together</td> <td rowspan="4" class="out">Dry Mix</td> </tr> <tr> <td class="ingredient">1 tsp baking soda</td> </tr> <tr> <td class="ingredient">0.5 tsp fine sea salt</td> </tr> <tr> <td class="ingredient">0.5 tsp ground cinnamon (optional)</td> </tr> </table> </div> <!-- print copy: 3 cols, under the cap of 5 — direct duplicate, no split needed --> <div class="print-only"> <table class="flow print-table"> <tr> <td class="ingredient">180 g all-purpose flour</td> <td rowspan="4" class="step wide">whisk together</td> <td rowspan="4" class="out">Dry Mix</td> </tr> <tr> <td class="ingredient">1 tsp baking soda</td> </tr> <tr> <td class="ingredient">0.5 tsp fine sea salt</td> </tr> <tr> <td class="ingredient">0.5 tsp ground cinnamon (optional)</td> </tr> </table> </div> <h2 class="stage">Assembly & Bake</h2> <div class="table-scroll screen-only"> <table class="flow"> <tr> <td class="ingredient">Wet Mixture</td> <td rowspan="2" class="step wide">stir in mashed banana</td> <td rowspan="3" class="step wide">fold gently just until no dry pockets remain — do not overmix <span class="star">*</span></td> <td rowspan="3" class="out">Batter</td> <td rowspan="4" class="step wide">pour into prepared pan; top with split banana or 30g walnuts/cacao nibs (optional)</td> <td rowspan="4" class="step wide">bake 350°F, 55–65 min, until tester comes out clean with a few moist crumbs <span class="star">*</span></td> <td rowspan="4" class="step narrow">cool in pan, 15 min</td> <td rowspan="4" class="step finish"> <ol> <li>lift loaf out using the parchment overhang</li> <li>transfer to a wire rack</li> <li>cool completely before slicing <span class="star">*</span></li> </ol> </td> </tr> <tr> <td class="ingredient">Mashed Banana</td> </tr> <tr> <td class="ingredient">Dry Mix</td> </tr> <tr> <td class="ingredient">Oven & pan, prepped — preheat 350°F; line 8.5×4.5-in pan with parchment, overhang on sides</td> </tr> </table> </div> <!-- print copy: 8 cols > cap of 5. "Batter" is a natural named output partway through, so split there: segment 1 = ingredient + 3 cols through Batter (4 cols total); segment 2 carries "↳ Batter" as its identifier cell, covering the remaining 4 process columns. --> <div class="print-only"> <table class="flow print-table"> <tr> <td class="ingredient">Wet Mixture</td> <td rowspan="2" class="step wide">stir in mashed banana</td> <td rowspan="3" class="step wide">fold gently just until no dry pockets remain — do not overmix <span class="star">*</span></td> <td rowspan="3" class="out">Batter</td> </tr> <tr> <td class="ingredient">Mashed Banana</td> </tr> <tr> <td class="ingredient">Dry Mix</td> </tr> <tr> <td class="ingredient">Oven & pan, prepped — preheat 350°F; line 8.5×4.5-in pan with parchment, overhang on sides</td> </tr> </table> <h2 class="stage print-continued">Assembly & Bake (continued)</h2> <table class="flow print-table"> <tr> <td class="carry">↳ Batter</td> <td class="step wide">pour into prepared pan; top with split banana or 30g walnuts/cacao nibs (optional)</td> <td class="step wide">bake 350°F, 55–65 min, until tester comes out clean with a few moist crumbs <span class="star">*</span></td> <td class="step narrow">cool in pan, 15 min</td> <td class="step finish"> <ol> <li>lift loaf out using the parchment overhang</li> <li>transfer to a wire rack</li> <li>cool completely before slicing <span class="star">*</span></li> </ol> </td> </tr> </table> </div> <div class="tips"> <h3>* Tips</h3> <ul> <li><strong>Browning the butter:</strong> Swirl the pan often once the butter starts foaming — the milk solids go from golden to burnt in under a minute, so pull it off heat as soon as it smells nutty.</li> <li><strong>Don't overmix:</strong> Fold the dry ingredients in just until the streaks of flour disappear. Overworking the batter develops gluten, which makes the loaf dense and gummy instead of tender.</li> <li><strong>Checking doneness:</strong> A few moist crumbs on the tester are what you want — a fully clean tester usually means the loaf is already slightly overbaked.</li> <li><strong>Cooling fully:</strong> Slicing while warm makes the crumb gummy; a full cool on the rack lets the structure set for cleaner slices.</li> </ul> </div> </div> <div id="panel-full" class="tab-panel full-recipe"> <h2>Ingredients</h2> <ul> <li>400 g very ripe bananas (~3–4 medium, heavily spotted or black)</li> <li>113 g unsalted butter, browned and cooled slightly</li> <li>110 g dark brown sugar (packed)</li> <li>2 large eggs, room temperature</li> <li>60 g sour cream (or plain full-fat Greek yogurt)</li> <li>1 tsp pure vanilla extract</li> <li>180 g all-purpose flour</li> <li>1 tsp baking soda</li> <li>0.5 tsp fine sea salt</li> <li>0.5 tsp ground cinnamon (optional, for subtle warmth)</li> <li>Optional topping: 1 sliced banana split lengthwise, or 30 g chopped toasted walnuts/cacao nibs</li> </ul> <h2>Instructions</h2> <ol> <li>Brown the Butter <ol> <li>Melt the butter in a saucepan over medium heat. Swirl occasionally until the milk solids turn golden brown and smell nutty (about 4–5 minutes).</li> <li>Pour into a mixing bowl and let cool for 5 minutes.</li> </ol> </li> <li>Prep Oven & Pan <ol> <li>Preheat the oven to 350°F (175°C).</li> <li>Line an 8.5×4.5-inch loaf pan with parchment paper, leaving an overhang on the sides.</li> </ol> </li> <li>Mix Wet Ingredients <ol> <li>Whisk the brown sugar into the warm brown butter until combined.</li> <li>Whisk in the eggs one at a time, followed by the sour cream and vanilla extract, until smooth.</li> </ol> </li> <li>Mash & Fold Bananas <ol> <li>In a separate bowl, mash the ripe bananas thoroughly with a fork (a few tiny lumps are fine).</li> <li>Stir the mashed banana into the wet mixture.</li> </ol> </li> <li>Combine Dry <ol> <li>Whisk together the flour, baking soda, salt, and cinnamon in a small bowl.</li> </ol> </li> <li>Fold Lightly <ol> <li>Add the dry ingredients to the wet mixture.</li> <li>Fold gently with a spatula just until no dry pockets of flour remain. Do not overmix — overworking flour creates excess gluten, which turns banana bread heavy and dense.</li> </ol> </li> <li>Bake <ol> <li>Pour the batter into the prepared pan. Top with a split banana or a light scatter of cacao nibs if desired.</li> <li>Bake at 350°F (175°C) for 55 to 65 minutes, or until a tester inserted into the center comes out clean with just a few moist crumbs.</li> </ol> </li> <li>Cool <ol> <li>Let cool in the pan for 15 minutes, then use the parchment handles to transfer to a wire rack to cool completely before slicing.</li> </ol> </li> </ol> <div class="tips"> <h3>Why This Recipe Delivers</h3> <ul> <li><strong>Not overly sweet:</strong> With only 110 g of brown sugar for the entire loaf, the primary sweetness comes almost entirely from the natural fructose of the 400 g mashed bananas.</li> <li><strong>Light, not heavy:</strong> The acidity in the sour cream reacts with the baking soda to lift the loaf cleanly, preventing that gummy, heavy bottom layer common in low-sugar bakes.</li> <li><strong>Complex depth:</strong> Brown butter adds toasted, nutty notes without adding extra volume or grease.</li> </ul> </div> <p style="margin-top:20px; color: var(--rc-muted); font-size: 12px;">Prep: 20 min · Bake: 55–65 min · Total: ~1 hr 30 min · Yield: one 8.5×4.5-in loaf</p> </div> <script> function showTab(tab) { document.getElementById('panel-card').classList.toggle('active', tab === 'card'); document.getElementById('panel-full').classList.toggle('active', tab === 'full'); document.getElementById('btn-card').classList.toggle('active', tab === 'card'); document.getElementById('btn-full').classList.toggle('active', tab === 'full'); } </script> </body> </html> ```Message 3 — add your recipe
Paste a recipe URL or the full recipe text. Copy this starter prompt, then replace the placeholder:
Using the skill instructions from Message 1 and the HTML template from Message 2 in this chat (not any external examples/ paths), turn this recipe into a flowchart recipe card. Match the template’s look exactly. When the card is ready, ask the follow-up with the exact five options from the instructions. [PASTE RECIPE URL OR FULL RECIPE TEXT HERE]When Gemini replies with HTML, save it as a
.htmlfile (to your computer or Google Drive), then open that file in your browser to see the card.Tip: some recipe sites block agents from reading the page. If Gemini can’t fetch the URL, copy the recipe text from the site and paste it into the chat instead.
Same chat: keep going in that thread — Gemini still has the pasted instructions and template.
New chat: repeat steps 1–3 — or set up a Gem on Gemini Advanced (below) so they stick.
Gemini Advanced — save as a Gem
Confirm you have Advanced
Custom Gems require a Gemini Advanced subscription (or a qualifying Google One AI Premium / Google Workspace plan). On the free standard tier, custom Gem creation won’t appear in the menu.
How to check: look at the top-left of gemini.google.com. If it only says “Gemini,” you’re on the standard tier. A Gemini Advanced badge — or an “Upgrade to Gemini Advanced” button — means Gems need that paid plan.
If you don’t see Gem Manager or Gems in the left sidebar, you’re usually on the free tier (or on a Workspace account where an admin hasn’t enabled Gems). Use the free paste steps above instead.
Create a Gem
Open the sidebar, select Gems, and click New Gem.
Paste the prompts into Instructions
Name your Gem (e.g. “Recipe flowchart”). Use Copy prompt for Message 1 and Message 2 above, and paste both into Instructions (no file upload needed). Then click Save.
Use it
Open your new Gem, paste any recipe, and use the Message 3 prompt (or ask):
“Turn this into a flowchart recipe card.”
Gemini will output HTML code. Save it to your computer or Google Drive, then open the
.htmlfile in a browser to view the interactive flowchart — it won’t render as a live card inside the Gemini chat.Tip: some recipe sites block agents from reading the page. If Gemini can’t fetch the URL, copy the recipe text and paste it into the chat.
Once saved, the Gem keeps the instructions — you don’t re-paste them each time.
Coming soon
Get notified when it’s in the app
This skill is an early look at recipe flowchart cards. Soon the same flow will live inside Cookbook of Mine — import a recipe, generate the card, and keep it next to your macros, pantry, and collection. Drop your email below and we’ll let you know when it’s ready.
By signing up, you agree to our Privacy Policy and Terms of Service.